kss_title_with_phone14.gif

Spring Start Up and Winterization Instructions for Krupske Sprinkler Systems installed in 2011 or after

Spring Start Up Instructions

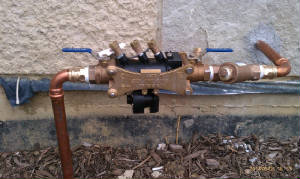
Wilkins 375 hooked up for Spring
RPZ valve correctly installed. Notice test ports are on top.

Step 1     Reinstall the RPZ valve outside and open the valves that were left at 45 degrees.
Step 2     Close the drains that were opened for winter.
Step 3     Turn the main water valve on.
Step 4     Check each zone and make sure all the sprinkler heads are spraying correctly.
Step 5     Call us for the annual RPZ certification as required by law.

Please click here to see our service plans available and schedule a Spring Start Up

Winterization Instructions

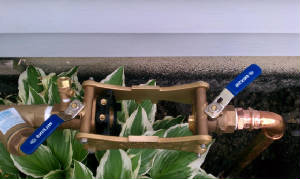
Wilkins 375 winterized
Winterized - Notice the Handles at a 45 Degree Angle

Step 1     Shut off the main water valve for the sprinklers.
Step 2     Go outside and remove the RPZ valve. This is done by removing the 2 screws on top of the RPZ valve and lifting the wedge unit out. Then lift out the center valve portion and bring RPZ inside for the winter.
Step 3     Turn the RPZ valve handles outside at a 45 degree angle. (This is ½ on and ½ off) This is very important or the valves will freeze and split and you will pay for new ones.
Step 4     Locate sprinkler drain if any. If located inside, open and drain into a bucket. If located outside, open and leave.
Step 5     If you have a sprinkler pump unplug at this time. Whole house pumps may be left plugged in.
Step 6     Program all stations to run for 5 minutes each. When cycle is complete, turn off clock. (You will not see or hear anything during this step)

As you can see, it is very simple to maintain the system yourself and save money. If you feel that you do not want to maintain the system yourself, we have service plans available for your convenience.

Please click here to schedule a winterization.

Thank you for selecting our company.  We look forward to serving you.